


- Qinsun Instruments Co., Ltd.
- Tell:+86-21-6780 0179
- Phone:+86-17740808215
- Address:No. 2578 Minhang District Gu Dai Road, Shanghai
- Contact:Mr. Li
- QQ:846490659
Installation and Commissioning Method of Circular Locus Pilling Test Machine
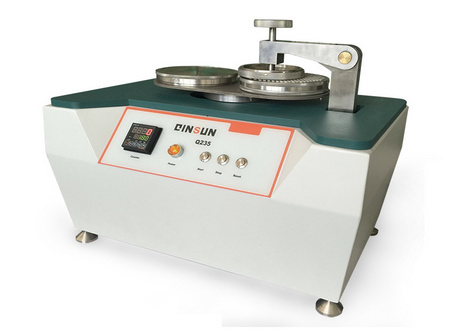
Circular Locus Pilling Test Machine uses nylon brush and abrasive or single abrasive to pilling the fabric by friction according to the specified method and test parameters. Then, under the specified lighting conditions, the pilling specimen will be compared with the standard sample and the pilling grade will be evaluated.
1. Before opening the box, the instrument must be checked thoroughly.
1.1 Check whether the accessories are complete according to the packing list.
1.2 Check if there are any loose parts due to transportation. 2.
2. Installation of Circular Locus Pilling Test Machine.
2.1 The instrument should be placed on a firm worktable and a rubber mat should be placed flat on the worktable to prevent the instrument from sliding when working.
2.2 Adjust the cushion foot nut to make it in a horizontal state.
2.3 Check whether the power supply voltage meets the requirement of 220V±10%, and connect the ground wire and introduce the socket.
3. Please test the instrument before use.
3.1 Set the counter preset friction times at will.
3.2 Clamp the specimen into the specimen chuck correctly and firmly.
3.3 Put down the chuck and make contact between the specimen and the brush plane.
3.4 Press the power switch to the "on" position, and press the "start" button to make the instrument start working.
3.5 Check the operation and whether the times are normal.
4. Circular Locus Pilling Test Machine to do fabric pilling test: 4.1 Take the specimen correctly and firmly.
4.1 Take the specimen correctly and firmly clamped into the specimen chuck. According to GB/T4802.1-97 regulations to the counter set the number of friction.
4.2 According to the provisions of the selected specimen pressure weight, if you need to increase the weight, you can tighten the required weight in the collet shaft.
4.3 Lower the specimen chuck so that the specimen is in contact with the brush plane.
4.4 Press the "RUN" button, the instrument can rotate according to the set number of times, and the instrument can stop automatically when the set number is reached.

5. Circular Locus Pilling Test Machine to do fabric pilling test: 5.1 According to GB4802.
5.1 Set the counter times according to GB4802.1-97.
5.2 Take the specimen correctly and firmly clamped into the specimen chuck.
5.3 Put down the specimen chuck, so that the specimen and abrasive plane contact.
5.4 Press the "RUN" key to make the instrument do the ball work.
5.5 After the automatic stop, turn up the specimen chuck and take down the finished specimen for evaluation.
6. Circular Locus Pilling Test Machine experimental procedure
6.1, the preparation before the test
6.2. The instrument should be kept level and the nylon brush should be kept clean before the test. If the instrument is used daily, do the cleaning work at least once a week. Clean the brush with a suitable solvent (e.g. acetone), comb out the short lint with a hand brush and clip off the protruding nylon filaments with a clamp.
6.3. Install the foam spacer, specimen and abrasive on the test chuck and the abrasive table respectively.
6.4, according to Table 1 to adjust the sample chuck pressure weight and friction rpm, other fabrics can refer to the table described in similar fabrics or separately selected test parameters and abrasives, to test.
6.5、Take off the specimen, in the rating box, according to the size of the ball on the specimen, density, form, compared with the corresponding standard sample, to the nearest 0.5 level to assess the ball level of each specimen. When the specimen frontal pilling condition is abnormal, depending on the degree of its impact on the appearance of taking a comprehensive assessment and to explain.